
Are you looking to upgrade your home lighting with something more stylish? LED strip lights are the most popular and versatile lighting solution available today. These modern and flexible strips can instantly transform any place into a vibrant one. However, the right LED strip lights installation is the key to a perfect lighting effect.

If you are new to the world of lighting, its installation may feel overwhelming. However, it is not as tricky as it seems. With the right tools and proper guidance, you can do it like a pro. Don’t worry if you’re a beginner and want to install LED strip lights. This guide will take you through a complete, step-by-step process of installing an LED strip light. So let’s get started!
Drawbacks of Wrong Installation
Installing the LED strip lights might seem simple at first. However, doing it in the wrong way can lead to several problems. So, before we proceed to the LED strip lights installation, let’s first understand the drawbacks of wrong installation.
- Poor Lighting Performance: If you do not install LEDs properly, they may appear dim, flickering, or uneven. This often happens when the power supply does not match the strip’s voltage. As a result, strips won’t give you a smooth and bright glow.
- Shorter Lifespan of LED Strips: One of the best things about LED strips is their lifespan. However, this only applies if they are correctly installed. If you expose the strips to too much heat or connect them incorrectly, they can lose brightness. Consequently, they burn out faster and deteriorate.
- Voltage Drop Issues: Voltage drop is another big issue of wrong installation. Long strips or improper wiring can cause a voltage drop. This means that lights become dimmer the further they are from the power source. This can make your lighting look uneven and unprofessional.
- Overloaded Power Supply: Using the wrong power adapter can overload the power supply. It can cause the strips to overheat or even shut down. In some cases, it may even damage the LED strip or become a fire hazard. Hence, it is crucial to match the power supply to the total wattage of the LED strip lights.
- No Control or Color Problems: For RGB strip lights, wrong installation can cause wrong color output. For example, you might press red and get blue, or the remote might not control the strip properly.
LED Strip Lights Installation: Step-by-Step Process
Have you grasped the importance of proper installation and the issues caused by improper installation? If so, let’s move on and explore how to install LED strip lights step by step.
Step 1: Plan Your Installation
The very first and most crucial step in LED strip installation is planning. Proper planning makes sure that your LED strip lights look great and work properly. So, start by choosing the exact location where you want to install LED lights. It can be anywhere, such as your kitchen cabinets, along the ceiling, the staircase, or shelves.
Once you have picked the spot, use a measuring tape to measure the total length. This will help you decide how many meters of LED strip to buy. Lastly, check out the power source. Find out where your nearest power outlet is. Make sure it is close enough to reach the LED strip’s power adaptor.
Step 2: Choose the Right Strip and Power Supply
Once your planning is done, the next step is choosing the right LED strip and power supply. This step is essential as it decides how your LED strip will look and function. Actually, there are several types of LED strip lights. Their selection depends on what you want the lighting to do. The common ones include:
- Single Color Strips: Produce only one color
- Smart LED Strips: These are Wi-Fi or Bluetooth-enabled strips.
- RGB Strips (Red, Green, Blue): They can change these three basic colors.
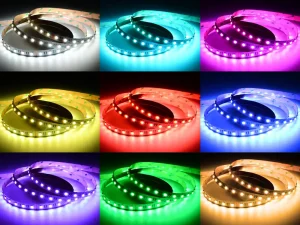
After deciding on the LED strips, think about the power supply. This is what gives electricity to your LED strips. So, make sure your power supply’s voltage matches your LED strip. For example, if your LED strip is 13V, the power supply must also be 13V. After that, calculate the total wattage. It is how much LED strips consume power based on their length.
Step 3: Cut the Strip (If Needed)
LED strip lights are designed to be flexible and customizable. One of their best features is that you can cut them to fit your space. However, keep in mind that you cannot cut an LED strip just anywhere. Light manufacturers place designated cut lines along the strip, usually every 3 to 6 LEDs.
These cut lines are often marked with scissors icons or small copper pads. Therefore, you should cut only these points. Cutting the wrong wire can break the circuit and stop it from working. Moreover, use a sharp cutting tool to ensure a straight and clean cut. Also, make sure to cut exactly on the marked line, not before or after.
Step 4: Connect the Strip to Power
Once your LED strip is cut to size, the next step in installing LED strip lights is the power connection. This part at first sounds technical. But don’t worry! If you follow the steps carefully, you can do it. So, first, identify the correct end of your LED strip where the power input is marked. Some of the LED strips come with a pre-soldered connector or plug-in adaptor.
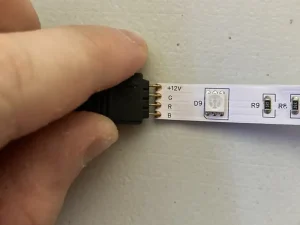
If so, just plug it into the connector and then into your power adapter. However, if your strip does not come with a connector, you may need to solder wires. Also, while connecting to power, always match the polarity (positive to positive, negative to negative). Once connected, plug the power adapter into a socket.
Step 5: Mount the LED Strip
Now that your LED strip lights are connected to power, it is time to mount them. Most of the LED strips come with peel-and-stick adhesive backing. You just have to remove that protective film and press the strip firmly. But remember, the surface should be clean, dry, and moisture-free. If not, the strip will not stick properly.
Moreover, for long-term use or tricky spots, the adhesive alone might not be enough. In this case, you have to use mounting clips, brackets, or double-sided tape for added security. However, mount the strips straight and avoid bending them too tightly. The reason is that it can damage the internal wiring and cause the light to shut off.
Step 6: Power Up and Test
Now that you have mounted the LED strips, it is time for the final check. So, carefully plug in the power supply and switch it on. Remember, your LED strip should light up evenly along the entire length. Take a close look and ensure that there are no dim areas. Also, check for flickering sections and the parts that are not lit at all.
If everything looks good visually, try using a remote to check the brightness level and color effects. This step confirms that your electrical connections are also working correctly. If you see anything dim, turn off the power and double-check everything. It is better to solve problems now before securing everything permanently.
Step 7: Tidy Up the Wiring
After testing your LED strips, the next important step is organizing the wires. Remember, the mess and exposed wires make the installation look unprofessional. Moreover, these spread wires can also lead to damage or safety issues. So I recommend using cable clips, wire channels, or cable organizers to secure any loose wire.
Moreover, make sure that controllers are placed where they are easily accessible. Also, ensure that the power adaptor and connectors are away from moisture. Try to cover the wires. The reason is that water drops can seep into the cables. As a result, they cause trapping hazards.
Common Mistakes to Avoid When Installing LED Strip Lights
Installing LED strip lights can be easy and fun. However, small mistakes can lead to poor performance, wasted money, or even damage. Therefore, it is crucial to address those common mistakes at first to reduce the chances of failure. So, below are the most common mistakes and how you can avoid them.
- Skipping the Planning: Most people start installing lights without proper planning. This can lead to running out of the strip due to poor placement. So always check your space and make a basic sketch before starting.
- Poor surface Preparation: If your surface is dusty, oily, or uneven, the strip won’t stick well. So, before installing the LED strip, clean the surface properly. Also, use the extra adhesives for tricky areas.
- Loose Connections: Loose connections are another overlooked mistake. If the connectors or solder joints are loose, your lights might flicker or stop working. So, make sure all connections are secure and strong.
- No Heat Management: LED strips don’t get very hot. However, poor airflow or sticking to heat-sensitive surfaces can shorten their life. So it is better to install them on the metal or aluminum channels to spread heat.
- Overloading the Power Supply: Connecting too many LED strips to one power source causes overheating. As a result, they can shut down or catch fire. So always leave some extra capacity (about 20–30%) in your power supply.
Frequently Asked Questions
What is the voltage drop in LED strips?
Voltage drop in LED strips occurs when the electrical power weakens as it travels along the strips. It means that LED strip lights farther from the power source appear dimmer than those closer to the power source.
Can I connect multiple LED strips together?
Yes, you can connect multiple LED strips together, but it must be done carefully. Each LED trip uses power. So you must make sure that your power supply can handle the total power (watts) needed by all the strips.
Are all LED strip lights waterproof?
No, not all LED strip lights are waterproof. Some are designed for indoor use only and do not have any water protection. Only those LED strips are waterproof, labeled with ratings like IP65, IP67, or IP68.
Conclusion
Installing LED strip lights is as simple as a DIY project. When done right, it can transform your space with stunning results. However, there are several drawbacks if it is done wrong. For example, the improper installation of LED strip lights can cause voltage drop and other power supply issues. That’s why in this article, I have discussed the step-by-step installation of LED strip lights.
For example, you have to first decide on the place, power supply, and strip length. After that, cut the strips and install them carefully. However, always use the proper power supply according to the voltage of the LED strips. Also, add some extra capacity for extra safety. Lastly, take your time, stay organized, and let your home shine with style!